SFTP Data Automation
¶ Introduction
SFTP, or Secure File Transfer Protocol, is a network protocol that provides completely secure access, transfer, and management of data files programmatically. This protocol is used by the largest organizations in Finance, Technology, and Consulting to transfer data such as Personally Identifiable Information (PII) to ensure it remains 100% secure.
¶ Security
To ensure the security of your data, we adhere to the highest standards in data security. The advanced security measures we take include:
SSH Key Authentication: The SSH public RSA key is the universally secure way to authenticate the SFTP server. Authentication through an SSH Key is significantly more secure and robust than the traditional password-based authentication.
IP Whitelisting: We whitelist the IP Addresses you will be accessing your SFTP server from to ensure you, and only you, have access.
Anomaly Detection: To ensure no loss of data, we detect anomalies in your uploads to the SFTP server and warn you when an upload would significantly change your account.
Encryption: Data is encrypted, keeping your information safe and private.
¶ Setup
Setting up Account Automation can be configured from the settings tab in your Uber for Business Dashboard. The quickest way to get you up and running is to put your Account Manager in touch with your IT department.
Most enterprise software platforms offer SFTP functionality out of the box including Oracle and Workday.
SFTP Setup includes the following steps:
- Enable SFTP
- Connect to SFTP
- Test SFTP Upload
- Enable SFTP Upload
¶ Step 1: Enable SFTP
To enable SFTP, visit the Uber for Business dashboard at business.uber.com and go to the settings page. Scroll down to the Data Automation section and click “Setup Data Automation.”
Note: You will need administrative access to Uber for Business in order to complete this. If you are working with you business counterpart or the Uber Account Manager, they can also complete this task.

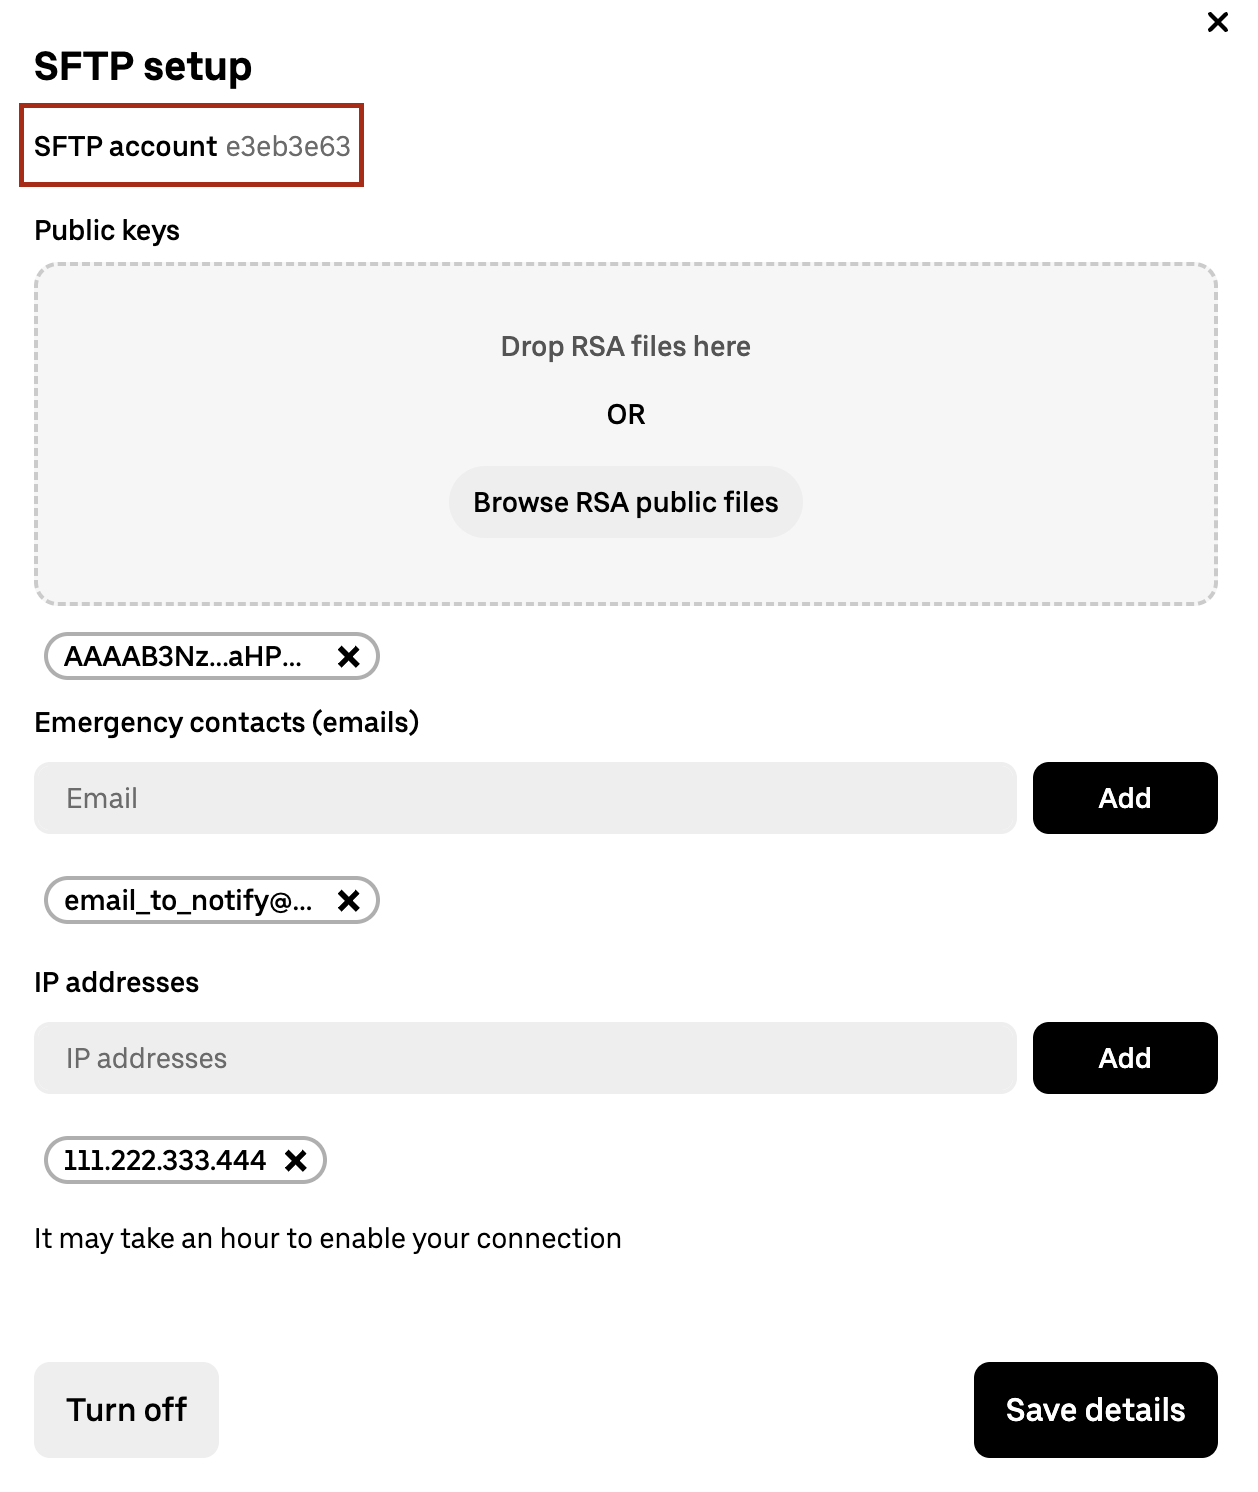
¶ Enter Details
To create an SFTP account, we require three pieces of information:
Public RSA Key - Upload your public RSA key by clicking Add RSA public key(s). For instructions on generating a key, see section below.
Points of Contact - In case there are any issues with your account, please provide the names and contact information of key POCs at your company (preferably in your IT department).
IP Addresses [CIDR Notation] - Please provide the public IP addresses of all computers that will be connecting to enable account automation. Be sure you don’t share your private IP address, as the connection will not be successful. Note: We support CIDR notation ranges and IP v4. We do not currently support IP v6.

¶ Save Details
Once you’ve saved this information, we will generate a username with which you can access the SFTP server to upload and download files as required. The username can be found in the SFTP Account field under the Data Automation section.
¶ Creating an RSA Key
The SSH public RSA key is the universally secure way to authenticate the SFTP server. It is significantly more robust than a password and is the backbone of the secure web.
¶ Mac/Linux
- To generate a public RSA key, run the following command in a terminal window:
ssh-keygen -t rsa -b 4096
- Open the folder by typing:
open ~/.ssh/
- You should see the following two files in your folder:
id_rsaandid_rsa.pub. Upload theid_rsa.pubto the Settings page in the Uber for Business dashboard.
¶ Windows
-
Download Putty and PuttyGen
-
Open the PuTTYgen program.
-
For Type of key to generate, select SSH-2 RSA. Click the Generate button. Move your mouse in the area below the progress bar. When the progress bar is full, PuTTYgen generates your key pair.
-
Type a passphrase in the Key passphrase field. Type the same passphrase in the Confirm passphrase field. You can use a key without a passphrase, but this is not recommended.
-
Click the Save private key button to save the private key. Warning! You must save the private key. You will need it to connect to your machine.
-
Click the save public key button to save the public key. Upload the public key to the Settings page on your Uber for Business Dashboard.
¶ Finding your IP
If IT is configuring the set-up, they can provide the IPs that the file will be uploaded from. If you’re planning to connect to SFTP from your computer, a quick way is to search on Google “What is my IP” and copy and paste the value from there.
¶ Step 2: Connect to SFTP
Connect to SFTP using the following credentials:
- Username: found under “SFTP Account” in the settings page
- Domain:
sftp.uber.com - Port:
2222 - Authentication: Use “private key” or “key file login” and locate your private key file created from Step 1. You may need to enter a password if you’ve protected your RSA key with a password.
Once you connect successfully you should see a few folders:
- from_uber: access archives of your company’s Uber transactional data
- to_uber: upload and sync data configuration, such as employee roster and expense codes
- test_to_uber: test that the data configuration is accurate before turning it on in production
You can verify this connection process using FileZilla or Cyberduck:

¶ Step 3: Test SFTP Upload
The test_to_uber folder allows you to verify your file before making permanent changes to your Uber for Business account. By uploading to test_to_uber, files will be processed on the server without making changes to your Uber for Business account. An email will be sent to contacts listed on the settings page to verify success or failure to parse the file.
SFTP upload supports two data types: Employee and Expense Codes. For the accepted file formats, please visit the Employee Automation and Expense Automation guides.
We highly recommend that you verify the file format is correct by uploading to the test_to_uber directory before uploading to the to_uber directory.
¶ Step 4: Enable for Production
Once you’ve verified that Uber can parse your files, upload the CSVs to the to_uber folder.
Data on the Uber for Business dashboard should reflect the changes within the hour.
¶ SFTP integration for multiple dashboards
With Parent dashboard: If your organization has multiple dashboards with Parent/Child relationship, then you can choose to Manage employees on Parent dashboard.
Wihtout Parent dashboard: If you have multiple Uber for Business Dashboards without Parent/Child relationship, please follow the same steps above on each of your dashboards. Each Uber for Business Dashboard will have it’s own unique SFTP account number associated which can be found as shown in SAVE DETAILS section of step 1.
¶ Subnet whitelisting
If you want to use IP whitelisting for traffic to and from Uber, please allowlist Uber’s external subnets listed here.
Disclaimer: The subnets are subject to change without notice.