Webhook
The Uber Eats Marketplace APIs includes a variety of webhooks for incoming orders, store notifications, and order cancellations. In order for your service to receive webhooks from Uber, set your webhook URL in the developer dashboard Setup section, under **Webhooks > Primary Webhook URL. All of the webhooks notifications from Uber’s platform will be sent to your unique primary webhook URL configured within the developer dashboard.
¶ Uber Eats Marketplace Webhook Notifications
The Order API sends notifications to your app’s configured webhook. Each notification has a corresponding event_type:
event_type |
Description |
|---|---|
orders.notification |
Sent whenever an order is created. |
orders.failure |
Sent when an order is cancelled. (Only applies to stores configured on API version 1.0.0.) |
orders.release |
(If fast order release is enabled) Sent when an order is configured for Fast Order Release and courier has reached geo-fence. |
orders.scheduled.notification |
Sent whenever a scheduled order is created. (Only applies to stores configured on API version 1.0.0 and where scheduled orders are enabled.) |
orders.cancel |
Sent when an order is cancelled. (Only applies to stores NOT configured on API version 1.0.0.) |
store.provisioned |
Sent whenever a store has granted access to your application/client ID. |
store.deprovisioned |
Sent whenever a store has been removed access from your application/client ID. |
order.fulfillment_issues.resolved |
Sent whenever a customer has confirmed change on Resolve Order Fulfillment endpoint. |
store.status.changed |
Notification when a store’s online status has changed. Requests the scope eats.store.status.notification be whitelisted for your client ID. |
¶ Order JSON body parameters
The table below describes each parameter in the order webhook notification. Review the Additional sections below for alternative webhooks:
¶ Example Order Notification
Order webhooks are listed within API reference Order API Suite.
¶ Webhook Security
All webhooks sent from Uber contain a signature in the header of the request so that your app can verify that the sender is Uber.
Webhooks requests contain an X-Uber-Signature header. The value of this field is a lowercased hexadecimal HMAC signature of the webhook HTTP request body, using the client secret as a key and SHA256 as the hash function.
Python Example
digester = hmac.new(client_secret, webhook_body, hashlib.sha256)
return digester.hexdigest()
¶ Expected response
-
Your service should POST a
200response status code with an empty response body to acknowledge receipt of the webhook event. If no acknowledgement is received, Uber will continue to retry the webhook according to the retry logic described below. -
After acknowledging receipt of the webhook, you must explicitly POST
/accept_pos_orderor/deny_pos_orderwithin 11.5 minutes. Otherwise the order will time out and auto-cancel. Order acceptances should be posted as quickly as possible to minimize Eater cancellations. Note: If your store is set up to receive robocalls for unaccepted orders, a robocall will be triggered if no Accept/Deny is posted after 90 seconds.
¶ Retry logic
If Uber receives either of 500, 502, 503, 504 status codes, timeout or any network error, the webhook event will be retried. The first retry will be sent 10 seconds after the initial event. The following events will be resent based on an exponential backoff algorithm, starting at 30 seconds after the 10s retry, then again after 60 seconds, then after 120 seconds, and so on until a response is received or until 7 total events were sent without a response.
¶ Set up your webhook URL
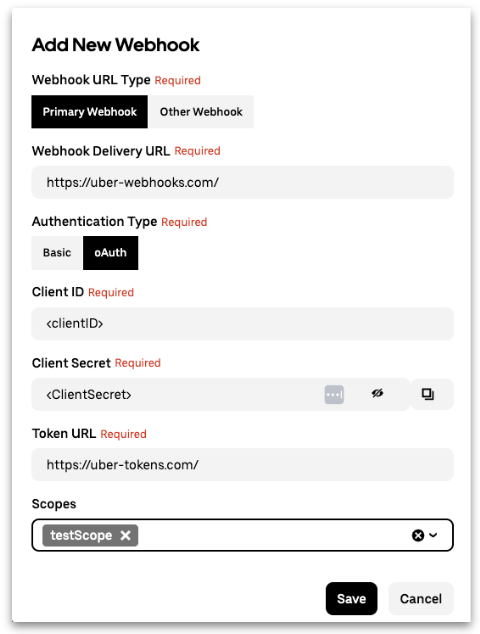
- In the Developer Dashboard under your Application, Select Webhooks in the left-hand navication panel. (At this time, Uber’s Eats Marketplace integrations only support a singular Primary Webhook URL.)

- Uber offers both Basic Auth and OAuth on our webhooks configured within the dashboard. For OAuth, set your server’s:
- Webhook Delivery URL
- Authentication Type
- Client ID
- Client Secret
- Token URL
- Scopes
¶ Test the webhook
Place an order on Uber Eats to send a webhook notification to your service.
- Sign in to Uber Eats with your test developer account and set the delivery address as the test store address. Place an order (you do need to enter any payment information). Uber will send an order notification event to the webhook URL.
-
Check if the webhook was received. Your service should have received a notification request from Uber, with the request body similar to the example notification.
-
Acknowledge that your service received the webhook by sending a
200status code response.
If you did not receive a webhook notification, make sure you used a valid webhook URL and have enabled your service to receive requests. If you have multiple stores, use the user_id (which corresponds to store_id) from the webhook to map events to the right store.
¶ Next steps
See the Integration Configuration guide for steps to activating and configuring stores.